Hem tape is a way of hemming your clothes without the use of needles and threads. The adhesive on the hem tape, which is has two sides, gives a strong bond that lasts even through repeated laundering.
Bias tape on the other hand is a thin band of material which is cut “on the bias.” A bias simply means an angle of 45 degrees across the fabric. A bias cut provides more elasticity to the cut piece due to the configuration of fibers in the material.
Bias Tape vs Hem Tape (Uses)
Bias Tape

- Measurement: the width of double fold bias tape is approx. 1/2 inch, total length is 10 yards, enough for you to use, and easy to sew by your hand or machine to make straight or curved edges; This tape is not completely continuous due to the length and nature of the textile
- Durable to use: this black bias binding tape is made of poly, durable and long time for you to use, machine washable and non-stretch; Winding risk, please keep them away from little kids
- Convenient design: our wide fold tape is pre-folded so that you don’t need to iron it before using, which can give your finishing touch to necklines ruffle edges, pockets, inside seams, and the classic color will easy to match
Bias tape is a thinner band of a material that has been cut on the bias.
The fibers of this tape are inherently now at angle of 45 degrees to its length. This makes bias tape stretchier and more pliable, unlike a strip that has been cut on the grain.
Several individual pieces can be combined to form any length tape needed. The width of bias tapetypically varies from about 0.5 inches to 3 inches, however, this depends on the applications.
Uses of Bias Tape
Bias tape is used to make seams for binding, piping, and completing raw edges.
Bias tape can be found on the edges of shirt armholes, necklines, bibs, quilts, placemats, when matching or complementing the main fabric is desired. It is also often used as a fastener or a tie for casual bags and other clothing pieces.
Lastly, bias tape that is commercially obtainable is sold as single fold, double-fold, and simple bias tape.
Hem Tape
Hem tape is a kind of adhesive that is fusible and designed for hemming, mending, and taking in garments.
It is easy to use and requires less work. This makes it attractive to some costume makers and crafters.
Uses of Hem Tape
Hem tape may be used to create a new hem. More often though, it is used to repair existing hems.

- Width: 0.59inch/1.5cm, Length: 27.34 Yards/25m each roll. Package includ: 2 rolls of hem iron-on tape
- Iron-on, double-sided adhesive for easily and hemming garments and home décor without any sewing. No-sew, simply iron the hem together; Creates a clean hem in seconds
- Easy to apply: flat the clothes, cut a piece tape and place it in the seam, damp the clothes surface, then leave the iron on it for about 10 seconds moving iron back and forth. For heavy fabrics, you can use two or more strips for durable stronger bond
When strained under frequent use or stretching, many hems start to lose stitches and are in danger of completely unraveling.
Hem tape can then be used to make sure that the stitches do not continue to unravel.
Hem tape can also be used to hold hems until they are sewn. This is easier for crafters to test the hem before sewing it permanently.
It is also useful with heavy or slippery fabrics that have a tendency pull out of place during sewing.
Lastly, they come in various sizes, widths, strengths. For instance, lightweight tapes are appropriate for fabrics like silk or cotton, but cannot hold heavier weight fabrics like corduroy.
Selecting the correct width is essential because hem tape should not be visible. Make sure you choose the right type of hem tape for the fabric of your project.
Bias Tape Basics
Bias tape, as aforementioned, is a thin strip of fabric that is produced by folding and cutting in a diagonal manner across the fabric grain.
It is used in general for binding edges and seams, fashioning buttonholes, making piping, drawstrings, and embellishment.
There are two different types of bias tape: single fold and double-fold.
Single fold bias tape requires two folds along a single strip of bias cut fabric, in order to fold the raw edges evenly to the middle.
Double-fold bias tape starts in the same manner as the single fold with the raw edges folded evenly to the middle.
However, it is then folded in half again before being sewn together, for a total of three folds per strip.
Single Fold Bias Tape

- MATERIAL: Made up of cotton and polyester blend, single-fold bias tape, durable material machine washable, nonstretch.
- USAGE: Full Funk’s Bias tape can be used in making piping, binding, seams, finishing raw edges, edges of quilts, placemats, and bibs, around armhole and neckline edges and as a simple strap or tie for casual bags, masks or clothing.
- DIMENSIONS: This quilting tape is 0.5 inches in width and 10 yards in length which is about 30 feet and 360 Inches.
- High-quality hem tape for all your sewing need at a highly affordable cost.
A single fold bias tape is often used as a facing to hem necklines or armholes, for decoration purposes with contrasting or complementary colors or patterns, and to finish inside seams by covering raw edges. It also makes good material for creating your own piping.
Double-Fold Bias Tape
Double-fold bias tape is used to bind edges, make ties, straps, button loops, or drawstrings.
Making Your Own Bias Tape
Can you make your own bias tape? Absolutely yes!
The most important thing to keep in mind is the width of the bias tape you need to finish your project neatly.
For example, if you need a half-inch double-fold bias tape, you will need to have a one-inch bias tape maker.
Items You Will Need
Rotary cutter or scissors
Ruler or measuring grid
Bias tape maker
Fabric
Iron

- 1/2″ Wide Double-Fold Bias Tape ~ Poly Cotton
- Binds straight or curved edges. Color accent for home and apparel.
- No ironing needed. Colorfast. 1/2″ (13mm) wide 50% Polyester / 50% Cotton.
Procedure
Choose the fabrics of your choice. They could be knits, corduroys, cotton blends, or satins.
Cut some squares of fabric according to the lengths of bias tape you want. Remember you will be measuring on the diagonal. Fold your squares into a triangular shape.
Fold the triangle in half again by folding down the top corner to meet the bottom corner.
Now you have a four-layered triangle—one side with all raw edges, the other side with two folds, and the last side with one fold.
Turn the triangle so that the edge with one fold lies at the bottom. Then clean the raw edges.
Measure out two inch strips and cut them.
Put the right sides together and arrange the short ends of the strips.
Then sew one quarter inch seam diagonally across. If there are any little triangles sticking out, trim them off.
Open the seam and thread one end of the strip into the bias tape maker. Tug it through the maker and secure the folds. You will notice that one fold may be smaller than the other.
Lastly, for double-fold bias tape, fold the strip into half again. Then press with a hot iron. Press the entire strip.
How to Sew Bias Tape
Use a stay-stich ¼ inch away from the raw edges to prevent stretching of the fabric as you work.

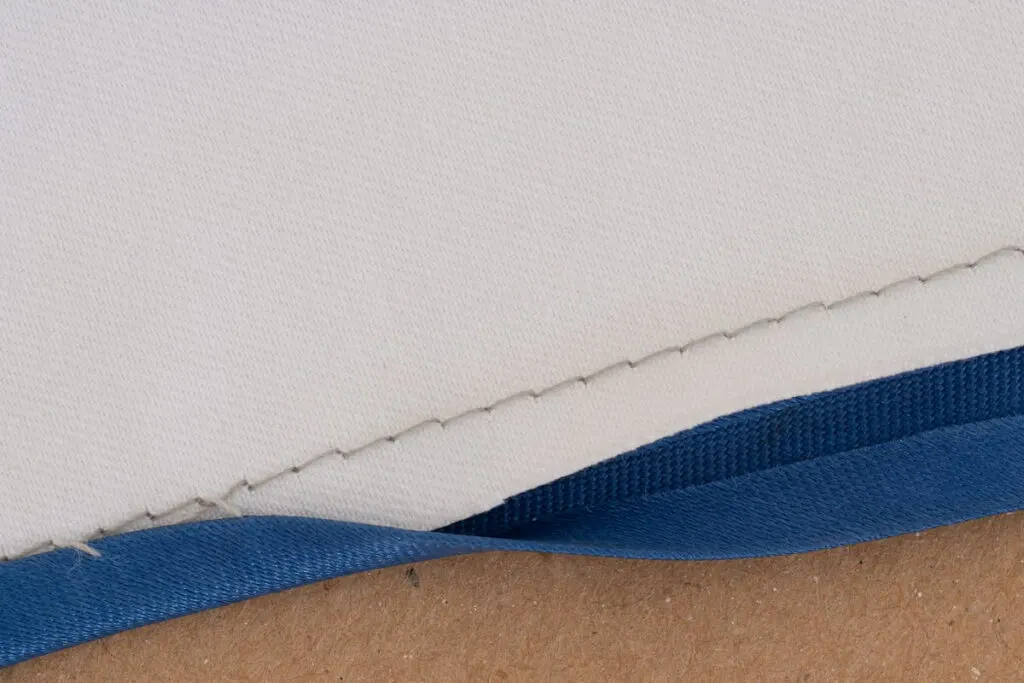
Set the bias tape open and place the top edge against the raw edge of the clothing material, ensuring that the right sides are together.
Sew the fabric to your bias tape using a straight stitch.
Fold up the seam allowance to encase in your bias tape.
Fold your bias tape on to the inside of your work and pin into place.
Topstitch through all the layers in your fabric and bias tape to secure the hem. The raw edges should now be encased fully.
Hem Tape Basics
Hem tape is a fusible, iron-on material that bonds one side of the material to the other side.
Hem tape is placed in between the materials to be fused and then ironed to activate the adhesive.
Sometimes, hem tape can leave a residue on the lower side. Ensure your iron is hot enough to heat the tape if your fabric is thick. Otherwise, the glue may not fully activate and the hem may come out.
Double-sided sticky hem tape is a piece of fabric tape with adhesive on both faces.
To use, remove one side of the paper and apply it to the one side of the fabric.
To make sure that the bond is good enough, run your fingers firmly along the tape.
Then, remove the second piece of the paper and press the other side of the fabric to it to bond the sides together. Then iron to heat the adhesive.
No products found.
How to Sew Hem Tapes
Hang the material on a hanger for enough time to reduce wrinkles, or iron any wrinkles out. Wrinkles can affect the evenness and measurements of the hem.
Take measurements of your piece just to be sure of how much you want to use. Most clothing patterns give an allowance of two-three inches.
Pin your tape on the right side of the fabric. (If using double-bias tape as well, be sure to evenly insert the material amid the two portions of overlapping tape).
Stitch near the bottommost edge of the hem tape to secure it. Then, make reference to the above dimensions and then pin your clothing to your preferred hem size.
When making a hem tape of two inches, use a ruler and pin or mark every two inches. Repeat this method until the whole material is fully pinned.
Carefully straighten the hem using an iron, beginning from the bottommost point to the top, and be keen not to disturb the pins with the iron.
Complete the hem on your sewing machine or by hand. If you are hand-stitching, ensure that you cautiously catch threads of the underside of the clothing material with your needle to prevent the hem from showing on the right side of your clothing.
If using a machine, use the blind stitch setting. Then press the hem with an iron to lay it flat.